Google Analytics

Showing posts with label technical tips. Show all posts

Saturday, 27 July 2024

Compass

My first compass, from 1973. And I still have its 24-page instruction leaflet. 

The leaflet goes into great detail, enough to enter an orienteering competition, but I used the compass mainly to check I was heading roughly in the right direction. When you are walking the twenty-five miles through the mountains from Rannoch to Fort William in the Scottish Highlands, the last thing you want is to go wrong at the high watershed and somehow find yourself miles astray at Kinlochleven. I suppose most would use a SatNav now. 

Another brilliant walk was around the hidden, Blea Gill Waterfall near Grassington in Yorkshire. You follow the track along the Western side of Grimwith Reservoir (since considerably enlarged) to Blea Beck, and then climb to the top of the waterfall to Grassington Moor. A circular anti-clockwise route takes you back via Hebden Beck to the starting point on the B6265 road. 
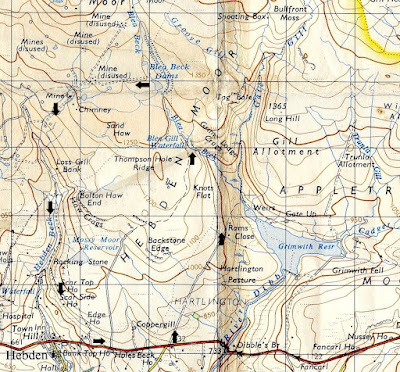
Route around Blea Gill Waterfall (1967 1-inch map)

It was wild above the waterfall, very boggy, with few obvious tracks. There were centuries-old, disused lead mine workings, chimneys, shafts, and spoil heaps, a strangely beautiful landscape of industrial desolation, deserted by the legions of miners that once toiled there. You saw no one else all day, and without a compass it would have been easy to lose your bearings. Proper walking. I am told it has now been cleaned up with signposts, notice boards, and warnings not to fall down the concealed mine shafts. 

Blea Gill Waterfall, Grassington Moor,1974
Blea Gill Waterfall, 1974
Grassington Moor now

I then looked for routes needing more precise compass work. I remember walking with friend Neville up to Alport Moor from Howden Reservoir in the Derbyshire Dark Peak. The ascent passes through dense evergreens before reaching open moorland, which levels out gradually, curving up so you cannot see the top until almost there. Neville looked dubious when I said the Alport Moor trig point was a little way straight ahead, and indeed there it was. He had complete faith in my map reading after that, often misplaced. 

We also liked to cross the Derbyshire moorland plateau of Kinder Scout, from Fair Brook to Kinder Downfall. I wrote about it here. It is not far across, but the maze of deep, watery, peat ridges and trenches known as hags and groughs, twisting and turning in all directions, make it impossible to keep to a straight line. All distant features are below the horizon, so there is nothing you might aim towards. Unless you check your compass every few yards you go hopelessly off-course. 

Navigating With The Compass

From the top of Fair Brook to Kinder Downfall you follow a bearing of about 255 degrees, but you do not really need to know about bearings. All you have to do is set the compass using the map, and then follow it. Well, that is how I do it. 

The needle of the compass points red to the North. It swivels inside a black dial, which can be manually rotated on a transparent base plate. The base plate has a large arrow pointing away from the needle. 

You place the compass on the map with the large arrow pointing roughly in the direction you want to go, and then slide it so that one of the long edges of the base plate passes through both your current position and your target destination, e.g. from the top of Fair Brook to Kinder Downfall as circled in yellow in the photograph. You then rotate the dial so that North on the dial matches the grid lines on the map. There are lines inside the dial to help with this. It does not matter which way the map or the magnetic needle are pointing at this stage. 

Setting the compass: Fair Brook to Kinder Downfall

You can then put the map away for a while. Stand up and hold the base plate level with the large arrow pointing ahead of you. Slowly turn round until the red needle lines up with North on the dial, and walk straight ahead. It helps to choose a distant feature to aim towards, if one can be seen. 

There is a lot more to it, but I usually find this sufficient. You could adjust for the difference between Magnetic North and Grid North, but over short distances it probably does not matter much, so I am not going into that. It makes only about 2 degrees difference at present, although in past decades it has been as much as 10. It slowly changes. It is also worth mentioning that map grids do not always point to True North, but, again, it does not really matter. I could explain these different kinds of North, but do you really want to know? 

The 24-page leaflet explains all this in greater detail. I have archived a PDF copy here, in case you are nerdy enough to be interested. 

As mentioned at the start, this was my first compass. I later bought a new, supposedly more accurate mirror compass, but never got the hang of it. I simply fold out the mirror and use it in the same way as the old one. I believe that for greater accuracy you can read the needle through the mirror, and look at objects through the hole and the notch. I am told that you can even measure heights, if so inclined. But I would rather enjoy the countryside than study for qualifications in surveying. At least the new compass fits neatly into your trouser pocket without any sharp corners to castrate you when you sit down. And the mirror allows you to check your face is still perfect after a long day out in the wind and rain. 

Thursday, 25 April 2024

Blog Address

I have removed the custom address for A Yorkshire Memoir and reverted to the original taskerdunham.blogspot.com (instead of taskerdunham.com). If reading this, you are in the right place. 

This is to prevent the blog from becoming inaccessible when the subscription to the custom domain expires. It still has over a year to run, but I have made the change early because custom domains are often bought by others for illicit use. 

Thanks. 

Technical and Other Considerations (for anyone considering doing it themselves) 

Removing the custom address turned out to be easier than anticipated. I thought I would be wrestling with the technicalities of canonical names (cnames) and the like, but that was not the case. 

All I had to do was:

1) Delete the custom domain name in the blog settings. The blogspot.com version of the address worked straight away. The taskerdunham.com address began to be shown as unknown. 

2) I created a completely new blog called "A Yorkshire Memoir (Old Address)" saying what I was doing, and also a note in the title that the address had changed. 

3) Then, on the Old Address blog, I simply added www.taskerdunham.com as the custom domain. Surprisingly, that URL immediately began to redirect to the "Old Address" site. It did not require any change to the cnames on the domain provider's site. It did, however, take a few minutes before the https version of the address became active after I switched it on.

The outcome is that access to taskerdunham.blogspot.com now links straight to the active blog, and access to taskerdunham.com links to the "Old Address" site. I will leave it like that for now as a reminder to those who use that route to change their links.

Please let me know of any problems. 

Internal links within the blog - The blog archive, list of popular posts, etc. changed automatically. Links in blog posts that reference other posts still work correctly so long as they point to a taskerdunham.blogspot.com address, but if they point to taskerdunham.com a message appears saying either that the post does not exist or that the site cannot be accessed at all. It depends on how http/https and www are specified in the link. Fortunately, I have always used the blogspot version within the blog, so don't have to change them. 

External links -  Where others' blog posts or websites have included a link to one of my blog posts, these links now point to the "Old Page" site, i.e. taskerdunham.com, with a page not found message. The same happens with sidebar links on other Blogger blogs until they are updated. 

Google, Bing, and other search indexes - Initially, the results from searches remained unchanged, i.e. they referenced the custom address. Clicking these links led to the "Old Page" site, i.e. taskerdunham.com, with a page not found message. I assume the search indexes will automatically update in due course, but it may take several months. 

I was soon receiving emails from Google to say that pages addressed as the custom domain could not be indexed, and they disappeared from Google search, but the .blogspot.com versions did not appear either. I have tried forcing the issue through the Google Search Console which appears under Crawlers and Indexing in the blog settings, but do not really understand what I am doing. 

UPDATE October 2024: Google search has not caught up yet. Some of the previously most visited posts no longer appear. Bing and DuckDuckGo seem better. The hit rate has gone down to at best a third of what it was. 

Tuesday, 16 March 2021

Facial Animation

Back in December, I posted a piece about the automatic colourisation of black and white photographs. One of the web sites I mentioned, MyHeritage, has now added a new feature called Deep Nostalgia which animates faces. “Animate the faces in your family photographs”, it says. “Experience your family history like never before”.

It gives me an excuse to re-post this wonderful picture, taken before a boat trip from the Yorkshire seaside resort of Bridlington in 1929.

First, let’s look at what face animation does to our Prime Minister’s official photograph. The result may not be suitable for those of a nervous disposition. 

Where photographs have multiple faces, the tool crops out and animates one at a time.

I animated five of the faces from the automatically colourised version of the 1929 photograph, and put them together in the following video. They are (1) my grandad on the right, (2) my dad standing behind him, (3) the Somerset Maugham lookalike in the hat on the left (there is a crease in the original photograph), (4) the woman behind him, and (5) the wiry-haired man behind her:

I don’t know why some video segments are longer than others. I think the woman comes out best but it doesn’t really endear them to you. I certainly didn’t “spend the evening balled up in tears” as the following news report implies. It also touches upon the dangers of these tools.

The MyHeritage site only allows you to animate five faces before asking for money. However, my experiments were carried out in collaboration with my very good friends Mickey Mouse, Billy Liar and Seán ÓEigeartaigh. Between us, we were able to do it without paying. Their assistance was greatly appreciated. 

 Video links if you can’t see them:

Monday, 14 December 2020

Colourisation

I have been playing with colourisation tools. No, not paints and crayons, but software that colours black and white photographs automatically. It uses “artificial intelligence” and “deep learning” through “electronic neural networks” “trained” on millions of colour photographs. 

“Wow! Fantastic!” one might say, but having once worked on the periphery of a team of artificial intelligence researchers, I remain sceptical. I used to go from “Wow! Fantastic!” to “Is that all it is?” in the space of a forty-five minute seminar. 

Carried out manually, colourisation is a skilled, time-consuming, labour-intensive process. As well as expertise in tools such as Photoshop and a level of colour-sense I simply do not possess, it can also involve historical research to indicate what colours the photographer actually saw. Experts can spend a month on just one picture. 

So, it would be wonderful to be able to colour photographs automatically. I found these free resources (it may not be a complete list): 

With four of them you upload a black and white photograph to the web site and then download the colourised version. Pixbim is different in that you download and install a trial version on your computer and carry out the colourisation locally.

Are they any good? I tried them out on black and white photographs from earlier blog posts.

Bridlington c1929 - colourised by MyHeritage

Uncle Jimmys Bullnose Morris c1929 - colourised by photomyne

Bridlington 1955 - colourised by MyHeritage

Grandma 1963 - colourised by playback.fm

In general, the different tools gave different results and no one was consistently better than the others. I tried to pick the best result in each case but you might have chosen otherwise as I possess a different distribution of cone cells from most people. My choices might be a bit green, or a bit pink, I dont know, I wouldnt be able to tell. However, there were some truly awful ones, one of which seems to think I was wearing pissy underpants.
 
Colourised by Pixbim

Colourised by Algorithmia

Colourised by photomyne

Colourised by Algorithmia

Of course, we do not know what the colours really were, although I do feel fairly confident that the Bullnose Morris was not brandy coloured, and know for a fact that the Pratts petrol can on the running board was spruce green (#2e4a41), which none of them got right.
 
One test of colour accuracy would be to re-colourise an existing colour image after first reducing it to monochrome. MyHeritage does not seem too bad to me on the Abbey Road cover (I wonder if this was one of the pictures it was trained on), but they all struggled with scenery.   

The Beatles Abbey Road (left) recolourised from monochrome by MyHeritage (right)

Spring Polyanthus 2020 (left) recolourised from monochrome by MyHeritage (right)

Glacial deposits in Glen Roy 2020 (left) recolourised from monochrome by Pixbim (right)

Johnson and Trump (left) recolourised from monochrome by Pixbim (right)

It is pretty impressive that black and white photographs can be coloured automatically at all, even though the colours are by no means accurate and not a patch on the original. 

Colourisation does seem to add something, particularly depth. Perhaps it works better with cine film, as in Peter Jackson‘s painstakingly restored First World War films (They Shall Not Grow Old) in which the moving faces of young soldiers, poignantly grinning amidst the mud of the trenches, become living people like us. 

I am not as sceptical as I was, but find myself thinking that with photographs it is probably better to stick with the original black and white. 

It would be interesting to see your efforts (irrespective of whether you call it colourisation, colourization, colorization or colorisation). 


FURTHER NOTES

I usually preferred MyHeritage, photomyne or playback.fm, but some reviews speak highly of Pixbim, possibly because it allows control over the colours (see below).

The colourised photographs are not always the same size as you started with.

There are other limitations too. MyHeritage permits a limited number of free colourisations (I’m not sure what it is, maybe 10, but me, Mickey Mouse and Billy Liar have all used our quotas) before asking for a minimum £50 subscription to its genealogy services. One should also be aware that the uploaded photographs are retained and may be visible to others, but can be deleted.

Pixbim (the one you download and install) allows you to adjust various processing parameters, such as colour intensity and colour temperature (from reddish to blueish), and provides a brush tool for correcting incorrect colours, whereas with all the others you get what you are given. However, the trial version of Pixbim comes with only a 7-day licence after which it costs £40. Also, unless you buy it, the colourised photographs have “Trial Version” printed all over them, but you can get round this using PrintScreen to capture a smaller version of the coloured image.

I also found mention of two other tools: Colourise SG which now appears to have been withdrawn, and Colorize Photo (www.colorizephoto.com) which assists you in carrying out the colourisation yourself, which I have not tried. 


Wednesday, 9 December 2020

Dear Google User...

I have wondered for some time how long it can be sustainable for internet providers to keep storing ever increasing amounts of data. It all relies on chains of energy-burning electronics which must be enormously expensive in terms of hardware and energy use. It has even been suggested that if each person in Britain sent one fewer email per day it could save over 16,000 tons of carbon a year, equivalent to thousands of flights.

It looks as if Google are beginning to do something. Like me, you may have received this email:

Dear Google User,

We are writing to let you know that we recently announced new storage policies for Google Accounts using Gmail, Google Drive (including Google Docs, Sheets, Slides, Drawings, Forms, and Jamboard files) and/or Google Photos that bring us in line with industry practices. Since you have previously used one or more of these products in your Google Account storage, we wanted to tell you about the new policies well before they go into effect on June 1, 2021. Below is a summary of the new policies. Please reference our Help Center article for a complete list of what's changing...

The email provides links to policies and a help centre article. 

In essence, it goes on to say that if after the 1st June, 2023, you have not used these services for 24 months, or if you have exceeded your storage quota, they might delete your content. Other outfits such as Flickr have already started deleting things. I like the bit about it being “in line with industry practices” as if they have some kind of standards. There is the suspicion it is all about cutting the costs of non-profitable activities.

In other words, we can’t assume our stuff is going to remain in perpetuity. I guess, eventually, this may also apply to Blogger, Wordpress and other blogging platforms. At present, we can read blogs written twenty years ago or more, but it might not always be the case. All those interesting, witty and wonderful posts and comments we have all made could simply disappear.

Tuesday, 29 September 2020

Faded Page

The following may be of interest (with apologies to those already in the know). 

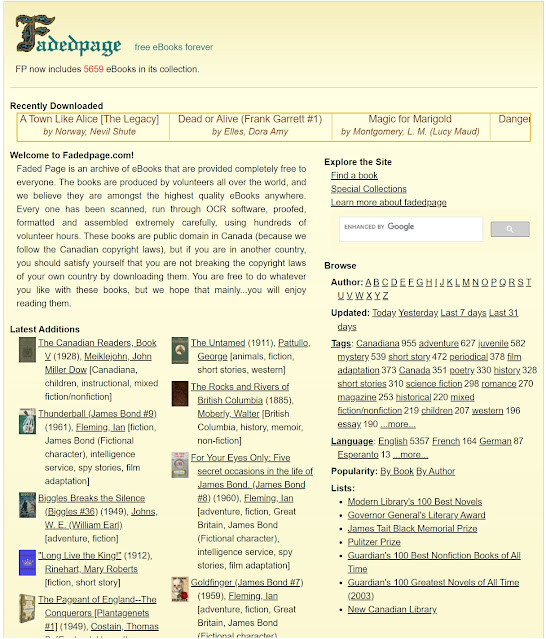
In putting together the next “New Month Old Post” post for Thursday, I came across a resource called Fadedpage ( https://www.fadedpage.com/ ) which contains a growing number (currently 5659) of free, high-quality, public domain (in Canada) ebooks in PDF, Epub, Mobi (Kindle) and other formats. 

Faded Page web site

For example (from a fairly random look through), it has Ian Fleming’s James Bond books, novels by C. S. Lewis, Nevil Shute and Evelyn Waugh, Winston Churchill’s Second World War series, books by Albert Camus in French, lots by George Orwell such as Homage to Catalonia and The Road to Wigan Pier, the Biggles stories of W. E. Johns’s and seemingly everything by Enid Blyton (or if you prefer the American equivalent, books from the Stratemeyer series including a couple of Laura Lee Hope’s Bobbsey Twins stories which I enjoyed at Junior School). Too many to mention, really.

Many, of course, are also available from the Kindle store, but often at a cost, and I tend to find that the digitisation of free Kindle books is of variable quality. 

It is fairly straightforward to add books in Mobi format to a Kindle device, but if anyone is unsure I could append a few screen shots showing how to do it.  
 
Now, I wonder how Biggles broke the silence.

Sunday, 7 April 2019

Adsense Revisited

UPDATES 


April 2022 - I have now removed ads from this blog

April 2024 - I removed the custom domain and reverted to blogspot.com to prevent the blog becoming inaccessible when the domain expires


Old Blogger+Adsense screen
Old Blogger + Adsense Screen, 2014

In the unlikely event of me still being here if and when the income from the ads reaches the £60 payout threshold, I’ll donate it to a worthy cause, perhaps by asking long-suffering readers for nominations. On the 1st September, 2021, it was £29.15.

*         *          *

By far the most visited and commented-upon post on this blog is one of the earliest: Adsense, Blogger and YouTube from November 2014. It’s one of several off-topic, technical pieces written out of an interest in how the web works behind the scenes, using some of the skills I learned writing user manuals for a software company around nineteen-ninety. 

The post describes a way of setting up Adsense ads on both Blogger and YouTube together, something Google used to make difficult. It was easy enough easy to have ads either on one or the other, but not both. From the comments, it appears some found the post helpful, although, from a technical point of view, the original post is now redundant. It became so some time ago when Google changed the criteria for YouTube ads. It also never applied to WordPress where you have no choice: with a free WordPress blog, you get ads, like it or lump it.

To test things out at the time, I set up ads on this blog where they still appear on the right and below (unless your browser blocks them). I set them up as a demonstration, not to make money – I would need to produce far more interesting content and get thousands more hits and clicks to make it financially worthwhile. In the month just ended, it generated the exhilarating sum of 10p, which is typical. Often it’s less, but just occasionally, it will be more if someone shows interest in an ad.  

Unfortunately for me, some readers detest blogs that carry ads and shun them. Some have actually said so as if I’m unclean. It’s a pity because many of them write rather interesting blogs.

Actually, I quite like the attractive blocks of colour that, by means of some impenetrable algorithm, Adsense places on the page. I wonder about them. I can see why the original post about Adsense attracts ads from computing businesses, and why posts about stamps and coins pull in ads for philately or numismatics, and why posts about school and college get ads for educational services. I feel miffed that some posts are apparently unworthy of ads. I’m disappointed when a post gets one of those ads that crop up indiscriminately almost anywhere, such as the ones for genealogy or PDF converters. And sometimes, there is the delight of an absurdly misplaced ad – the ones Private Eye call “malgorithms”.

I can’t match Private Eye’s quality of malgorithms: e.g. reports of overseas terrorist incidents accompanied by ads for holidays in those countries, or articles about paedophiles attracting ads claiming child models have never been so much in demand, but the other day I did notice that one of my posts about hi-fi stereo was adorned by an ad for hearing aids. Or was I just targeted because of my age?

Ads may be putting off some readers, but I am going to keep them, at least for now. It’s my party and I’ll cry if I want to.

Sunday, 24 July 2016

Side By Side Images in Blogger

(An off-topic post)

This post shows how to change the default layout of multiple photographs or other images in Google Blogger so that they appear side by side on the page instead of sequentially underneath each other. It works for two, three or more images. It can also be used for videos.

There are different ways to do this. Some people suggest using HTML tables, others using an image editor to combine several images into one. I have used both these techniques elsewhere in my blog, but the following is simpler. As well as being simple it has the advantage of keeping the images separate so that if desired any one could be changed later.

First upload your images in the normal way by means of the Insert Image button on the toolbar. Let us assume for now that you have just two images. By default, Blogger displays them consecutively on the page, one above the other as shown below. The issue with this is that readers might have to scroll quite a long way down before they come to the next piece of text.

First Image

Second Image

To put the images side by side, go to the HTML part of the editor. At the top left click the HTML tab as indicated and you will see the underlying code for the page, like this:

Image code in Blogger

You now need to find the code for the images. The file names for mine are Image01.jpg and Image02.jpg and you can see these names each inside the middle of some complicated looking chunks of code. But in between these chunks you can see the following which begins at the end of one line and continues on two more lines (as highlighted above):

                                                                                </div>
           <br />
           <div class="separator" style="clear">; both; text-align: center;">

All you then need to do is to delete this section of code. Be aware that, depending on how you have uploaded your images, the <br /> line might appear more than once or might be completely absent. If there is more than one then delete them all. If it is absent then don't worry. Basically you should just delete everything from </div> to .... center;">.

Be very careful not to delete anything else. Do not delete anything other than </div> at the end of the first line. You might want to make a copy* of your blog post first so you can recover if you make a mistake.

After deleting the code, your images will be positioned like this:

First Image Second Image

Technically, what this achieves is to place both images inside the same <div> section of the page, rather than in separate divisions as occurs by default. 

You might have problems if your images are too wide for the page layout you are using. You will have to resize them. For example, my images are portrait orientation and set to the Blogger Medium size, but if they were in landscape orientation then they would not fit across the page. The second image would overflow to the next line so they would still appear one above the other. I could get round this by using the default Blogger Small size instead of Medium. 

You can use this technique to place three or more images side by side by deleting the two lots of intervening code. For three images I do need to resize them to Small to get them side by side across the page as shown. This works when viewed on a computer. It might not always work when viewed on smaller-screen devices such as phones and tablets.

First Image Second Image Third Image

To display a greater number of images side by side, even the default Blogger Small size might overflow to the next line. I can get round this by specifying the size of the displayed images directly, but this requires more detailed editing of the HTML code which needs greater care.

The code for each image will look something like the following. It specifies the image size, in this case height="200" and width="133".

<img border="0" height="200" src="https://blogger.googleusercontent.com/img/b/R29vZ2xl/AVvXsEhrd_oY1BcXPgmgjdGKXBNI6yHwCO5z509MALmHiJMlHNsns3Jq08pHsMhmAua5RRozX5xNyXcP0XQcri8-2qD7MZtZprdKn_9TZN0p3Xs98fKv4m47aB2X6SrZODj2YFFFSHmfNpcRZ-8/s200/Image01.jpg" width="133" />

If I reduce these dimensions by a scale of 0.7 so that height="140" and width="93" then it is possible to place more images across the page.

First Image Second Image Third Image Fourth Image Fifth Image

Readers can always click on the images to look at them full size.

In the above I have also removed the code style="margin-left: 1em; margin-right: 1em;" associated with each image (i.e I have had to remove five instances of this) to reduce the margin spacing and pack them closer together.

The remaining frames and shadows around the images are defined at a higher level - the css level - and will appear on all images on all posts on your blog. It is possible to remove these too, but to do so for a single image is beyond the scope of this post. However, if you want to remove the frames (but not the shadows) from all images on a single page, then insert the following code in the HTML editor at the very beginning of the blog post.

     <style type="text/css">
     .post-body img, .post-body .tr-caption-container, .Profile img, .Image img,
     .BlogList .item-thumbnail img {padding: 0; border: none; background: none;}
     </style>


Be very careful when editing HTML. It is so easy to wreck the whole page or lose it irrecoverably. When you have a lot of content it is usually best to play safe and make a backup copy.*

To see another example, I have used this technique for the cigarette card album at the end of my post Cartophilic Concerns. However, the first composite image in that post was put together using an image editor.

Finally, you can also use these techniques to place videos side by side. In the following, the video thumbnail images have been resized and placed within a single division rather than the default two. Again, this has the proviso that it works when viewed on a computer but not necessarily on phones or tablets, or in email feeds.


* One way to make an exact copy of a blog post is to go into the HTML code editor, place your cursor anywhere within the content, press CONTROL-A to select all the content, then CONTROL-C to take a copy. Close the window (do not save if prompted), begin a new blog post and give it a name such as 'Backup', go into the HTML editor and place your cursor in the empty window, press CONTROL-V to retrieve the copied content. Save but do not publish the post, then close the window. If you then make a mess of editing the original blog post you can always delete it and rename the Backup with the name of the original.

Friday, 21 November 2014

Adsense, Blogger and YouTube


UPDATES 


April 2022 - I have now removed ads from this blog
April 2024 - I removed the custom domain and reverted to blogspot.com to prevent the blog becoming inaccessible when the domain expires


(An off-topic post) The trials and tribulations of enabling Adsense ads on both YouTube and Blogger.

Summary: This describes how I enabled my blog for AdSense when already showing ads on YouTube - something others seem to have had difficulty with. It required registering my own top level domain because you can't use an AdSense account created with YouTube for hosted Blogger blogs. The post is off-topic as far as the blog goes, but the tale may be helpful to other bloggers. Apologies to regular Yorkshire Memories readers, but at least the ads might earn me a bit of pocket money.

*                   *                  *

I enabled AdSense on my two YouTube channels in August 2014. I wish I’d enabled it sooner considering I’ve had nearly 400,000 views over several years.

I also started this Blogger blog in August 2014 with the aim of linking it to AdSense. However, for the first three months the “Sign up for AdSense” button in the Earnings section was greyed out. Reading various forums, it seemed I might need to wait until the blog was 6 months old with perhaps as many as 40 posts before my blog would be eligible (I found Get Google Adsense Approval! 7 Things to Do That Really Work very helpful, despite it being more oriented to WordPress than Blogger).

I was therefore pleased to find the “Sign up for AdSense” button became active after just 3 months (exactly to the day) and only 12 posts. This may surprise some people who have been waiting for longer. It may be significant that (1) I am in the UK and (2) all my posts are very nearly text-only with between 1000 and 2000 words per post. 

Blogger and Adsense

Another problem was that when the “Sign up for AdSense” button first seemed to be active, it actually wasn’t. All that happened on clicking it was that a “Loading” message appeared briefly and then nothing else. Forums indicated this was a fault that was being corrected. After a few days it worked properly, and took me to the next screen.

Blogger and Adsense 

As I already had an AdSense account created from YouTube, I used my Google account sign in. After this my Blogger Earnings page provided a link to my AdSense dashboard.

Blogger and Adsense 

When “Show ads on blog” was set to “Yes”, then the “About Me” panel on my blog moved down to leave a blank space where the sidebar ad would go, and there was another space between the first two posts for another ad.

I thought I’d succeeded but the ads remained blank. I thought I just had to wait for them to activate but after a week they were still blank.

Again referring to the forums, it seems you can no longer place ads on Blogger using an Adsense account that was initially set up with YouTube. This was confirmed by a banner on my AdSense dashboard: 

“Your AdSense account is enabled only to show ads on YouTube. If you want to show ads on a different site, you’ll need to provide us with the URL of the site you want to monetise. You can do this via a one-time application form.”

Blogger and Adsense 

In other words, if the AdSense account was accepted through YouTube you can only use it with YouTube. To use it anywhere else you have to apply for an upgrade but this can only be done with a top level domain name.

Again, looking around the forums, there seemed to be two possible things I could do.

(1) set up a second AdSense account just for Blogger. I have not tried this. It would involve creating a second Google ID, and would mean that any ad earnings from Blogger would go into a different AdSense account from the earnings from YouTube. A second ID would also violate the AdSense terms and conditions. As my earnings will be little enough as it is I want them all to go to the same AdSense account. In fact it’s hardly worth my while at all except for a sense of satisfaction. To be precise, my YouTube channels have earned just £1.41 over three months!

(2) register my own top level domain and assign this to the blog so that instead of a blogspot.co.uk address my blog would have its own address, and then I could apply to upgrade AdSense using the one-time application form.  This is what I decided to do.

I wanted a private domain registration to protect my name and address details. After looking at various options I decided to register www.taskerdunham.com through Namecheap.com with their free WhoisGuard subscription. It cost me $10.87 (£6.90) for one year’s private registration. It was very easy and became active immediately. If I had not wanted anonymity I could have done it elsewhere for much less than that. I know others have done it for free using a .tk domain.

The next step was to alter my custom domain www.taskerdunham.com to redirect to my Blogger blog. This means in effect that my blog has two addresses, (i) taskerdunham.com and (ii) taskerdunham.blogspot.co.uk – it will still be found at both URLs so I don’t have to worry about telling any existing readers of the change.

So in Blogger I went to Settings Basic and select  “Set Up A Third Party URL” and entered www.taskerdunham.com under Blog Address.

Blogger and Adsense

I clicked “Set up a third party URL” which produced a field to enter my new domain name www.taskerdunham.com and then clicked the Save button.

DONT PANIC! -this immediately produces the following Error 12 message which lists two CNAMES (canonical names used in domain registration): [DO NOT CLICK SAVE AGAIN JUST YET]

Blogger and Adsense 

All this means is that you have to redirect your custom domain name so that it points at your Blogger blog. You have to go to your domain registrar's website and alter the settings by entering the two CNAMES

                                        www                          ghs.google.com
                                        cfo5........                   gv-ii ......dv.googlehoosted.com

Different domain registrars will have different procedures and you may have to search around for instructions and examples. Blogger has a help page for the common ones. In my case I signed in to my Namecheap account and found their useful help page “How do I use my domain with my Blogger account?” showing exactly how to do this and where to enter the two CNAMES (there is a video as well, but not specific to setting up Blogger blogs). In case anyone else opts for Namecheap, here is my completed screen accessed by the “All Host Records” link:

Modify domain CNAMES for Adsense

I only entered the CNAMES - I did not touch the '1800' field or the other fields underneath this section.

Having done this at Namecheap, I returned to Blogger and clicked Save on the screen shown above, which produced the following screen listing the two URLs for my blog. Here I also clicked Edit next to www.taskerdunham.com and checked a box which seems to cover the possibility of someone missing the www from the front and typing just taskerdunham.com. I don’t know whether that’s essential because most browsers seem to handle that anyway.

Blogger and Adsense

Success! All seems to work. My blog can be seen at www.taskerdunham.com and www.taskerdunham.blogspot.co.uk and www.taskerdunham.blogspot.com and it still works if the www. is omitted as well.  I can also still edit my blog and make new posts by signing in to Blogger with my Google ID in the usual way.

But I'm not finished yet. Now I have to apply to AdSense for approval for my top level domain using the one-time application form. Actually it's just a field you fill in.

Domain and Adsense 

You then get a Thanks for applying screen and have to wait. It also says that “In order for your application to be approved, you must place your ad code on one or more webpages at the URL you entered in your upgrade application. Note that blank ads will be shown until your application is approved.”

Domain and Adsense

Well, ad codes and blank ads were already on my blog because the “Show ads on blog” box on the third screen above was still ticked and there were still blank spaces on the page. I could see these had been set up in the My Ads section of my AdSense account as below. I don’t think you need to do anything else at this point other than wait. However, just to make sure, I did click the +New Ad Unit button and created some new code, which I placed at the end of my blog using Layout – Add a Gadget – HTML/JavaScript on the Blogger menu and copying and pasting the new code into the box that appears. But I doubt you have to do this.

Domain and Adsense 

Some forums say it can take a few days or even a month for the AdSense upgrade to be approved. In fact mine happened within two or three hours. I got the following email, and WOW! as you can see, the ads are on the blog!

Domain and Adsense

I suspect that if I do not want to maintain my custom domain, then after a year I can revert my blog back to being a hosted account, and ads will continue to appear. I have yet to find out.

LATER

1. I find that on the AdSense website, the ads for the blog sidebar and between-posts are now listed as status Idle. I think this is because no on has clicked them for a week - well they couldn’t could they because they haven’t been displaying. This is nothing to worry about. They become active again if and when someone clicks them .... later still - they are now showing as active again.

2. I also now find I can generate AdSense code and put it on my free Weebly site. That is now displaying ads too. I just have to wait a few days now to check whether they are showing as impressions on AdSense.